DIY Hand Painted Patterned Desk
- Michelle Wen

- Jul 23, 2020
- 3 min read
I was inspired by bone-inlay striped desks. However, they retail for over a thousand dollars, and I also don't know how I feel about having bone as a material for my desk... so here's a fun DIY project.

Materials:
-artist's tape
- chalk paint
- primer
- paintbrush
-larger paint brush for the finish
-water-based finish
-your furniture
- drop cloth/ garbage bag
- box cutter or knife
-microfiber cloth
I ordered this desk from Joss & Main (jossandmain.com). I assembled the entire thing except I did not screw in the drawer faces. I kept those separate. I cut up a garbage bag to create a plastic sheet to protect the gold frame from paint. I made sure the surfaces were dust-free with a microfiber cloth.

I didn't like the stark plain white of the desk, and also the manufactured wood had that smooth surface that wouldn't take painting well. Even though chalk paint claims to work on unsanded, unprimed surfaces, I did not want to take that chance. I wanted to prep it at least a little, so I mixed some acrylic gesso, which is basically primer, with some acrylic paint. I was going for an off white or cream color, so I put a few drops of yellow and yellow ochre acrylic paint with the gesso to create a white with a warm cast.
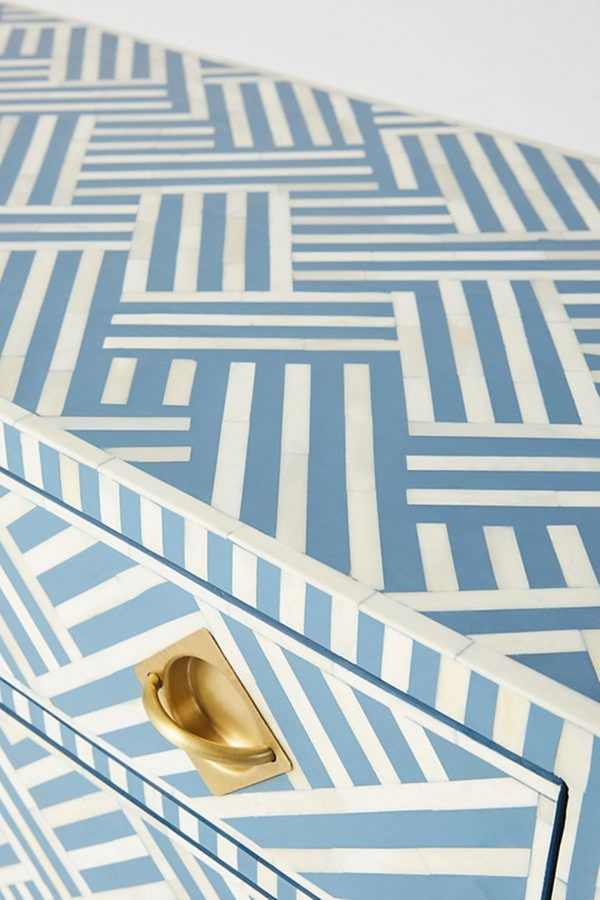
I tried to follow a pattern of stripes from this bone inlay chest of drawers (R) and used artist's tape to create a stencil. I learned a trick by watching a chalk painting tutorial on Youtube to keep the width of the spacing even: use a piece of the same tape as your guide. I would lay my tape, use the spacer as a placeholder (essentially tape-less spaces that would become the blue), tape again. Tape (white), space (blue), tape (white), space (blue).


The pattern was difficult but I began by taping all the stripes in one direction across the entire desk, then tape in the other direction right on top of the old tape, using a knife to cut away extra tape that wasn't part of the pattern. You can see in the top right photo an example of that lattice pattern before it gets cut away. For the sides of the desk I kept them as vertical stripes.

I used Jolie Chalk Paint in Deep Lagoon, Matte Finish. This entire project including the drawers used up only half of this container, and it is a small container. I painted where the blank sections were, and used two coats.
Be wary that chalk paint comes across darker when it dries, and definitely needs the two coats even though it claims to do the job in one. I used a synthetic flat paintbrush for an even application. The paint is pretty self-leveling.

After removing the tape, the edges were looking real rough. I mixed acrylic paint to recreate the white color and cleaned up all the edges. This was the most annoying part.

The touch-up made all the difference.

Next: three thin coats of a water-based finish. The reason why I didn't go for the popular wax-finish that is usually used with chalk paint is because it's wax. It will literally melt. And it isn't hardy against wear and tear.
This Minwax Polycrylic finish will seal the wood without staining or bleeding the chalk paint, and it is very easy to use. It has a shine, but isn't mirror-like in the gloss so it does show the texture of the wood and the paint. It is much more watery in consistency than expected.
The label recommends sanding in between coats but I didn't feel like it was necessary. I don't want to risk sanding away my design since each layer of the Minwax was so thin. By the third coat I figured I could use a heavier application because it wasn't appearing glossy enough.
I let it dry for about 10 hours ( I could've let it dry longer but I was so excited!) So here is the finished product:

The drawer patterns are slightly different from the desk top, but I like that. Hope this was helpful for anyone interested in using these products or interested in some artistic renovations :)


Comments